Author Archives: Allen Huffman

About Allen Huffman

Co-founder of Sub-Etha Software.

Hacking the Color BASIC PRINT command – part 1

Over in the CoCo Facebook group, Erico Patricio Monteiro asked an interesting question:

“Would it be possible to PRINT a transparent character?”

– Erico Patricio Monteiro

His idea was for putting stuff on the CoCo’s text screen without wiping out the background. He used an example of PRINT”OOOOX” where “O” represented the transparent character. The way I see it, if you had the first line printed like this:

PRINT @0,"ABCDEFG";

…and you had such a transparent character and did this:

PRINT @0,"OOOXOOO";

…your top line would then look like this:

ABCXEFG

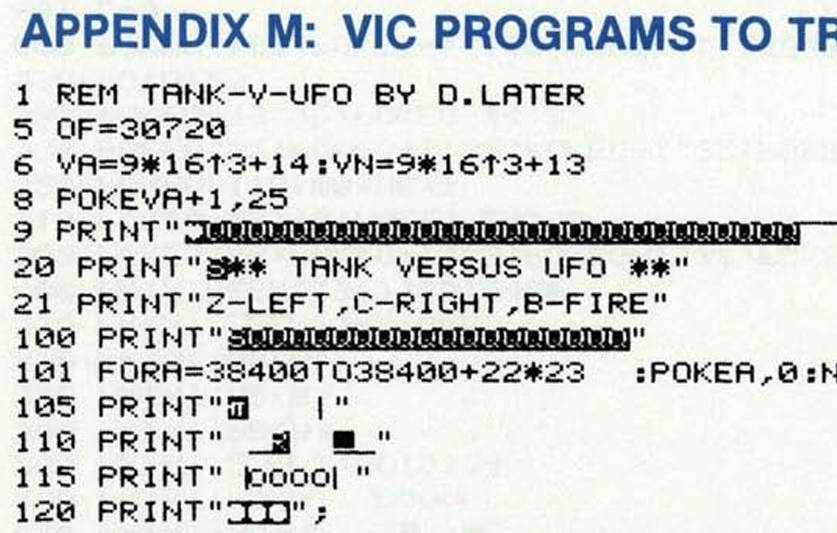
This reminded me of how my Commodore VIC-20 had cursor movement characters you could embed in a PRINT statement. Once you typed the quote, you could now embed typeable escape codes to change colors, clear the screen, home the cursor, insert or delete characters, or just move the cursor up, down, left or right. This made VIC-20 program listings require a graphical printer to represent those characters. Here is something from the VIC-20 manual:

This is many pages into the manual, after it had explained how you can embed things like color changes or reverse video. The program listings in the VIC-20 manual had graphical characters in them, and you had to learn what to type to recreate them:

Program listings for the VIC looked weird ;-)

At some point, Commodore BASIC listings were represented with text strings instead of the graphical characters, making a modern listing look like this:

25 print"{home}{down}{right}{black}abc{down}{left*3}def{down}{left*3}ghi{down}{left*3}jkl"

Then you just had to know what key was “black” or “left” (three times, as the “left*3” indicates).

But I digress…

Since there was no PRINT@ or LOCATE on the VIC-20, any time you wanted to print something in a particular spot on the screen you had to print the HOME (move cursor to top left of the screen) character then use a bunch of cursor controls to move to where you wanted to print.

This was … not optimal. And thus, most BASIC VIC-20 programs would print their information (lives left, etc.) on the top of the screen since it was shorter code just to home and print there:

VIC-20 Sky-Ape-Er, screen 3.

My Sky-Ape-Er VIC-20 game had a timer, and I got it in that top corner like this:

105 print"{home}{blue}{reverse on}{right}time:";t:t=t+1

You will notice the above snipped says “reverse on” and has “time” in lowercase, but on my screenshot it is uppercase without being reversed. That is due to the character sets of the VIC-20 where some modes were upper and lower, some were upper with reverse, and other combinations. For the mode I was in, reverse was getting the uppercase characters (and uppercase characters typed with SHIFT would be the graphical characters for those keys).

“But that’s really not important to this story…”

If you look at the Color BASIC Unraveled book you can find the Console Out routine (PUTCHR) on page 84. I did not want to type it all in here, but I did find this GitHub repository by tomctomc that has this already in a text file:

coco_roms/bas.asm at master · tomctomc/coco_roms

From the “bas.asm”, here is the code in question:

; CONSOLE OUT
PUTCHR          JSR         >RVEC3          ; HOOK INTO RAM
                PSHS        B               ; SAVE ACCB
                LDB         DEVNUM          ; GET DEVICE NUMBER
                INCB                        ;  SET FLAGS
                PULS        B               ; RESTORE ACCB
                BMI         LA2BF           ; SEND TO LINE PRINTER
                BNE         LA30A           ; SEND TO SCREEN

                ...snip...

; PUT A CHARACTER ON THE SCREEN
LA30A           PSHS        X,B,A           ; SAVE REGISTERS
                LDX         CURPOS          ; POINT X TO CURRENT CHARACTER POSITION
LA30E           CMPA        #BS             ; IS IT BACKSPACE?
                BNE         LA31D           ; NO
                CMPX        #VIDRAM         ; AT TOP OF SCREEN?
                BEQ         LA35D           ; YES - DO NOT ALLOW BACKSPACE
                LDA         #$60            ; BLANK
                STA         ,-X             ; PUT IN PREVIOUS POSITION
                BRA         LA344           ; SAVE NEW CURPOS
LA31D           CMPA        #CR             ; ENTER KEY?
                BNE         LA32F           ; BRANCH IF NOT
                LDX         CURPOS          ; GET CURRENT CHAR POSITION
LA323           LDA         #$60            ; BLANK
                STA         ,X+             ; PUT IT ON SCREEN
                TFR         X,D
                BITB        #$1F            ; TEST FOR BEGINNING OF NEW LINE
                BNE         LA323           ; PUT OUT BLANKS TILL NEW LINE
                BRA         LA344           ; CHECK FOR SCROLLING
LA32F           CMPA        #SPACE
                BCS         LA35D           ; BRANCH IF CONTROL CHARACTER
                TSTA                        ;  SET FLAGS
                BMI         LA342           ; IT IS GRAPHIC CHARACTER
                CMPA        #$40
                BCS         LA340           ; BRANCH IF NUMBER OR SPECIAL CHARACTER
                CMPA        #$60            ; UPPER/LOWER CASE?
                BCS         LA342           ; BRANCH IF UPPER CASE ALPHA
                ANDA        #$DF            ; CLEAR BIT 5, FORCE ASCII LOWER CASE TO BE UPPER CASE
LA340           EORA        #$40            ; INVERT BIT 6, CHANGE UPPER CASE TO LOWER & VICE VERSA
LA342           STA         ,X+             ; STORE CHARACTER TO SCREEN
LA344           STX         CURPOS          ; SAVE CURRENT CHAR POSITION
                CMPX        #VIDRAM+511     ; END OF SCREEN BUFFER?
                BLS         LA35D           ; RETURN IF NO NEED TO SCROLL

You can see at LA30A the code begins checking for things like backspace and enter. Eventually at LA342 it puts the character on the screen an increments X which is the current screen location. It then has code (not shown) that detects being at the bottom of the screen and scrolling up a line if needed.

To patch this CHROUT routine to support a “transparent” character, I think we’d just have to intercept the code at LA342 and decide if it should put a character on the screen (STA ,X+) or just increment X (LEAX 1,X or something) without putting anything there.

And that would be a real simply patch. A CoCo 1/2 with 64K could run the program that copies the ROM into RAM then switches over, then this could code easily be patched.

And while we were there, maybe it could be extended to support cursor movements as well, replicating how the VIC-20 output works.

But I am getting ahead of myself…

To be continued…

Modern C and initializing an array

I was today years old when I learned something that modern C can do. Thank you, Bing Copilot, for offering this up and learnin’ me somethin’ new.

At my day job I am porting various WIZnet (and hardware TCP/IP ethernet chip) services over to a new circuit board. We are using the W5500 chip, and making use of the provided I/O library from WIZnet:

Wiznet/ioLibrary_Driver: ioLibrary_Driver can be used for the application design of WIZnet TCP/IP chips as W5500, W5300, W5200, W5100, W5100S, W6100, W6300.

For this project, I have gotten basic Ethernet TCP running, then moved on to port their HTTP server code, followed by their SNMP server. While I may have encountered SNMP during my 1990s employment at Microware when I taught an OS-9 networking course, I have not touched it since then so this was “all new” again to me.

Part of configuring SNMP was an array of structures like this:

dataEntryType snmpData[] =
{
    // System MIB
    // SysDescr Entry
    {
        8, {0x2b, 6, 1, 2, 1, 1, 1, 0},
        SNMPDTYPE_OCTET_STRING, 30, {"Description String"},
        NULL, NULL
        },
    // SysObjectID Entry
    {
        8, {0x2b, 6, 1, 2, 1, 1, 2, 0},
        SNMPDTYPE_OBJ_ID, 8, {"\x2b\x06\x01\x02\x01\x01\x02\x00"},
        NULL, NULL
        },

…and so on. You can find this file here:

ioLibrary_Driver/Internet/SNMP/snmp_custom.c at master · Wiznet/ioLibrary_Driver

When I got to the part where I was adding the ability to send an “SNMP trap” (kind of a push notification to a specific IP address), I saw that it would duplicate the values in this array:

void sendTrap_sysObjectID(void) {
    // Create a dataEntryType for sysObjectID
    dataEntryType sysObjectEntry = {
        8, {0x2b, 6, 1, 2, 1, 1, 2, 0},
        SNMPDTYPE_OBJ_ID, 8, {"\x2b\x06\x01\x02\x01\x01\x02\x00"},
        NULL, NULL
    };
    // Send the trap
    snmp_sendTrap( ...params...);
}

Above, the “sysObjectEntry” array is a duplicate of the entry in my definition table.

This would mean keeping two parts of the code in sync, which is a terrible idea since it creates extra places for error, and also doubles the work. The A.I. suggested using the entry in the array, like this:

snmp_sendTrap(
  managerIP,
  agentIP,
  (int8_t*)"public",
  snmpData[1], // SysObjectID or your custom OID
  6,           // enterpriseSpecific
  1,           // specific trap ID
  1,           // one variable binding
  snmpData[10].oid, SNMPDTYPE_INTEGER, (uint8_t[]){1}, 1 // HighTempState = 1
);

Using “snmpData[1]” is more better, since now I can just change the definition table instead of multiple places hard-coding that information.

BUT, how do I know which entry is [1] versus [7]? I’d have to ensure the table entries stayed in order, then I could use a #define as an index, like this example:

typedef struct
{
	int x,y,w,h;
} BoxStruct;
// Declare an array of boxes, the old fashioned way.
BoxStruct box[] = // Initialize four boxes
{
	{ 0, 0, 100, 10},
	{ 10, 10, 90, 10 },
	{ 20, 20, 80, 10 },
	{ 30, 30, 70, 10 }
};
// Declare an array of boxes, the new fangled way.
#define BOX1    0
#define BOX2    1
#define BOX3    2
#define BOX4    3

That would let me get the data for box[BOX1] or box[BOX4]. Easy.

But if this was a long list of entries, like my SNMP was, and later I added something in between, I’d have to update the array as well as make sure this #define table is updated. Again, more place for error and more work.

The first thought was to declare the array as fixed size and initialize it like this:

// Declare an array of boxes, the new fangled way.
#define BOX1    0
#define BOX2    1
#define BOX3    2
#define BOX4    3
#define BOX_MAX 4
BoxStruct box[BOX_MAX];
box[BOX1] = { 1,1,1,1 };
box[BOX2] = { 2,2,2,2 };
box[BOX3] = { 3,3,3,3 };
box[BOX4] = { 4,4,4,4 };

That makes it easy and obvious, BUT you cannot have those initializes with global variables. You can only initialize that way from a function. This is fine if you want to declare your global array, then initialize like…

void initBoxes (void)
{
    box[BOX1] = { 1,1,1,1 };
    box[BOX2] = { 2,2,2,2 };
    box[BOX3] = { 3,3,3,3 };
    box[BOX4] = { 4,4,4,4 };
}

And that is the approach I would probably take on my “C-like” embedded compilers that do not support all of modern C.

However, the A.I. showed me something I had not seen before. Initializing the array like this:

// Initialize by element number, in order.
BoxStruct box[BOX_MAX] =
{
	[BOX1] = { 0, 0, 100, 10},
	[BOX2] = { 10, 10, 90, 10 },
	[BOX3] = { 20, 20, 80, 10 },
	[BOX4] = { 30, 30, 70, 10 }
};

Huh? I did a quick check on the Online GDB compiler, and that was valid. It even lets you initialize out of order:

// Initialize by element number, out of order.
BoxStruct box[BOX_MAX] =
{
	[BOX3] = { 20, 20, 80, 10 },
	[BOX1] = { 0, 0, 100, 10},
	[BOX4] = { 30, 30, 70, 10 },
	[BOX2] = { 10, 10, 90, 10 }
};

By doing it that way, I could “see” the label match the data, regardless of whatever the number the label was set to. And, if I messed up the #defines later (duplicate value or whatever), a “good compiler” with warnings enabled should alert me of that (at least, GCC does).

For my specific use, this is a great solution, and it works in whatever compiler the Microchip MPLAB X IDE is using for PIC24 processors.

Here is my test code:

/******************************************************************************
Welcome to GDB Online.
GDB online is an online compiler and debugger tool for C, C++, Python, Java, PHP, Ruby, Perl,
C#, OCaml, VB, Swift, Pascal, Fortran, Haskell, Objective-C, Assembly, HTML, CSS, JS, SQLite, Prolog.
Code, Compile, Run and Debug online from anywhere in world.
*******************************************************************************/
#include <stdio.h>
/*---------------------------------------------------------------------------*/
// Typedef
/*---------------------------------------------------------------------------*/
typedef struct
{
	int x,y,w,h;
} BoxStruct;
/*---------------------------------------------------------------------------*/
// Globals
/*---------------------------------------------------------------------------*/
// Declare an array of boxes, the old fashioned way.
BoxStruct foo[] = // Initialize four boxes
{
	{ 0, 0, 100, 10},
	{ 10, 10, 90, 10 },
	{ 20, 20, 80, 10 },
	{ 30, 30, 70, 10 }
};
// Declare an array of boxes, the new fangled way.
#define BOX1    0
#define BOX2    1
#define BOX3    2
#define BOX4    3
#define BOX_MAX 4
// Initialize by element number, in order.
BoxStruct foo2[BOX_MAX] =
{
	[BOX1] = { 0, 0, 100, 10},
	[BOX2] = { 10, 10, 90, 10 },
	[BOX3] = { 20, 20, 80, 10 },
	[BOX4] = { 30, 30, 70, 10 }
};
// Initialize by element number, out of order.
BoxStruct foo3[BOX_MAX] =
{
	[BOX3] = { 20, 20, 80, 10 },
	[BOX1] = { 0, 0, 100, 10},
	[BOX4] = { 30, 30, 70, 10 },
	[BOX2] = { 10, 10, 90, 10 }
};
/*---------------------------------------------------------------------------*/
// Prototypes
/*---------------------------------------------------------------------------*/
void ShowBox (BoxStruct box);
/*---------------------------------------------------------------------------*/
// Functions
/*---------------------------------------------------------------------------*/
void ShowBox (BoxStruct box)
{
	printf ("x:%d y:%d w:%d h%d\r\n", box.x, box.y, box.w, box.h);
}
int main()
{
	printf ("---foo---\r\n");
	for (int idx=0; idx<4; idx++)
	{
		ShowBox (foo[idx]);
	}
	printf ("---foo2---\r\n");
	for (int idx=0; idx<4; idx++)
	{
		ShowBox (foo2[idx]);
	}
	printf ("---foo3---\r\n");
	for (int idx=0; idx<4; idx++)
	{
		ShowBox (foo3[idx]);
	}
	return 0;
}
/*---------------------------------------------------------------------------*/
// End of main.c

You can mess with it online here:

https://onlinegdb.com/G73hxWSQuN

I wonder what other stuff has been added to C over the years that I do not know about…

Until next time…

We probably can’t trust X5 bloggers about the DJI Osmo 360 or Go Pro Max 2, can we?

I first took “one shot” 360 photos in 2005 using a weird “half-mirror on a stick” thing called SurroundPhoto. It created images like this one, which were processed into 360 panorama QuickTime VR files:

360 Disneyland in 2005.

I later backed a kickstarter for a 3-lens device that was specifically designed for taking 360 photos (the failed 360cam). I’ve also owned a Kodak SP360, as well as several RICOH Theta cameras. The Thetas became my go-to camera due to their ease-of-use and form factor. My first Insta360 was the ONE X2, and that device is what switched me from RICOH to Insta360 cameras.

All this to say … I’ve been following and playing with this stuff for twenty years (and even longer if you consider the way we used to make 360 panoramas by taking a bunch of photos and stitching them together later with software). Here’s a 2002 example of photos I took specifically to make a 360 panorama out of using special software.

But I digress… since my 360 world has been Insta360 for several years (I’ve had the ONE X2, X3, X4 and now X5), YouTube has learned to show me lots of Insta360 YouTubers. Meanwhile, other camera manufacturers such as GoPro and DJI have their own set of YouTubers that I am completely unfamiliar with. I assume they are also “sponsored” and generally say good things about the gear they “review” just like the Insta360 reviewers do. My current pet peeve is the YouTubers who have hardware sponsors that provide them gear, then they lie to use and say they are unsponsored (this is illegal in the U.S.A. thanks to Federal Trade Commission rules that require disclosures).

But I digress…

Familiarity

Since I do not know the DJI YouTubers, I have no idea if I can trust what they tell me about the new DJI Osmo 360. Instead, many of us have been waiting to see what our Insta360 YouTubers say about it. After all, we are familiar with them and “trust” them because of it.

But can we?

If you are getting special perks from a company, such as free hardware, gift packages, and even being paid to make special tutorials from time to time, would you risk all of all that to tell us that a competing product is better? I cannot see why Insta360 would keep supporting content creators that promote another company’s product as being better.

With that said, I have found the Insta360 YouTubers take on the DJI Osmo 360 to be very interesting. I have also been watching the (unknown to me) DJI YouTubers discuss it, though since this is a new category for DJI, those videos have to explain the basics of what makes 360 video so cool to their audience that is likely unfamiliar. This makes the DJI videos a bit less useful for those of us that have been doing this stuff for years.

My ask of you…

Please leave a comment and share links to the “best’ DJI Osmo 360 review videos you have found. This can be dedicated videos, or comparison videos. I will share them here in a future post (or update this one).

BONUS: With the upcoming release of the GoPro Max 2 360 camera, I’d like to know similar GoPro channels that I should check out.

Thankes!

Segway Max G3 firmware update.

I have not ridden my scooter in the past two week or so, and when I checked today I saw new firmware was available (here in the U.S.A. at least):

We are entering Fall (which lasts a few weeks before Winter takes over, often) so I may be able to get a few more weekend rides on the scooter. If I notice anything new or different, I will make a post.

Google Street View: GPS data contains gaps greater than 5 seconds in between GPS points.

Explain it to me like I am five…

Every time I think I have figured out what Google Street View expects, I encounter a new problem. This time, I have a file that Google says has gaps in the GPS data:

But the problem is, I have already tried to fix this multiple times using tools like gpsbabel. This command line utility will create in-between points at the rate you specify. You can use a value of 1 second and get a point every second in the entire GPX file.

Using GPX Editor on the Mac lets me inspect the tracking points. If I sort by duration value, the longest value in the entire file is 4 seconds:

Yet, Google claims there is a 7 second gap after 9 seconds. Looking at the points in time order shows this is not the case: (But do note, this GPS starts sooner than the video; so the points I show here may be from time before the video begins. This does not change the issue, since there is nothing reported longer than 4 seconds in the entire file, anywhere.)

Anyone care to explain why this happens and how I can fix it? I have gotten every other file I have uploaded to work just fine, except for these two I have been working on since last week.

Even when I run gpsbabel with a 1 second “gap” between each point, I still get this type of error.

What else is Google looking for? Web searches and even chatting with Google’s Gemini A.I. have not produced anything helpful.

Comments appreciated…

Osmo 360 versus Insta360 X5 in low light

Here are some comparison videos I recorded last weekend at Silver Dollar City theme park. I mounted both cameras side-by-side and rode their water-based dark ride, The Flooded Mine. Both cameras were recording in 360 video using the low light mode. I then reframed each to a 4K forward view to make this split screen.

There are two segments to this video. One shows them top/bottom, then the video is repeated side-by-side so you can see more of the horizontal and vertical image.

Next is a test of the single lens mode. The X5 was recording in 4K, and the Osmo 360 has some higher 5K-6K resolution mode. For the comparison video, 4K was used so the Osmo is scaled down to fit. This is a walk through Grandfather’s Mansion:

And a week before this, I visited Lost Island Themepark in Waterloo, Iowa. I was recording the indoor queue to their dark ride, Volcano. I was not intentionally doing a comparison of the two cameras, but I did record it twice, each time using a different camera. I put a short clip together showing this:

More to come… Let me know what comparisons you are interested in seeing.

Generating C functions and prototypes using macros – part 2

See Also: part 1 and part 2.

In the previous installment, I discussed how lazy I am and shared my general dislike of doing things manually when they can be automated.

So let’s automate…

If you program in C, you are likely familiar with using #define to set a value you can use elsewhere in the code:

#define NUMBER_OF_GUESSES 10

int answer = RandomNumber (100);
for (int try=1; try<=NUMBER_OF_GUESSES; try++)
{
    printf ("Try #%d of %d - guess a number from 1-100: ",
             try, NUMBER_OF_GUESSES);

    guess = InputNumber ();

    // ... logic continues ...
}

Now instead of updating multiple places in the file for the number of guesses, only the #define has to be changed. The #define has the advantage of not taking extra code or memory space like a variable would, which is important when you are working on embedded systems with 8K of RAM.

You probably have also seen #defines used for marking code to be included or not included in a program:

#define DEBUG_MODE

void Function ()
{
#if defined(DEBUG_MODE)
    printf ("Inside Function()\n");
#endif

    // ...logic continues...
}

WIth “#define DEBUG_MODE” there, the printf() will be included. Remove that #define (or comment it out) and it will not.

But #defines can also become macros with parameters, such as this:

#define SNOOZE(x) SleepMs(x*1000)

If you want to sleep for seconds, you could use a macro that turns into the call to the millisecond sleep with the passed-in value multiplied by 1000:

void Function ()
{
    printf ("Pausing for 5 seconds...\n");

    SNOOZE (5);

    // ...logic continues...
}

The C preprocessor will take that “5” and substitute where the “x” is in the replacement text, becoming:

void Function ()
{
    printf ("Pausing for 5 seconds...\n");

    SleepMs (5*1000);

    // ...logic continues...
}

Now if the code is ported to a system with a different sleep call, the #define can be changed to use whatever is available.

I’d expect anyone who has programmed in C has done one or all of these things.

But wait, there’s more!

But a macro does not have to be a simple number, string or function name. It can be a whole block of code that gets substituted. You can put in many lines, just by adding a “\” at the end of the line to continue parsing the next line after it:

#define DISPLAY_COUNTDOWN(x) \
    for (int idx=x; idx>=0; idx++) \
    { \
        printf ("%d...", idx); \
        sleep (1000); /* 1000ms, 1 second sleep */
    }

void Function ()
{
    printf ("Self-destruct activated...\n");

    DISPLAY_COUNTDOWN (10);

    // ...logic continues ...
}

And that would be processed to replace the “DISPLAY_COUNTDOWN(10)” with the C code in the #define:

void Function ()
{
    printf ("Self-destruct activated...\n");

    for (int idx=x; idx>=0; idx++) {         printf ("%d...", idx);         sleep (1000); /* 1000ms, 1 second sleep */     }

    // ...logic continues ...
}

Yeah, it would look ugly if you could see how the C preprocessor puts it in, but it builds and runs and you never see it (unless you specifically look at preprocessed output files).

But that is probably dumb. You should just make a “DisplayCountdown()” function and have it be more normal.

But wait, there’s less dumb…

But in the case of my panel functions, each one of them had a unique panel name and panel identifier, so using a function for them was not really possible. Each one had to be its own function since the functions contained the name of the panel (“PanelMainInit()”, “PanelMainTerm()”, etc.).

But a #define can do that…

#define GENERATE_PANEL_PROTOTYPES(panel_name) \
    int panel_name##Init (void); \
    int panel_name##GetHandle (void); \
    int panel_name##Display (void); \
    int panel_name##Hide (void); \
    int panel_name##Term (void);

The macro uses “panel_name” as the substitution “variable” passed in, and will place whatever text is there anywhere in the macro where “panel_main” appears. Since I wanted to pass in the filename (without extension) of the panel such as “PanelMain” or “PanelFaults”) and build a function name out of it, I use the ## concatenate feature that will glue the items before and after it together. That macro used like this:

GENERATE_PANEL_PROTOTYPES(PanelMain)

GENERATE_PANEL_PROTOTYPES(PanelFaults)

GENERATE_PANEL_PROTOTYPES(PanelAdmin)

…effectively generates the prototypes like this:

int PanelMainInit (void);
int PanelMainGetHandle (void);
int PanelMainDisplay (void);
int PanelMainHide (void);
int PanelMainTerm (void);

int PanelFaultsInit (void);
int PanelFaultsGetHandle (void);
int PanelFaultsDisplay (void);
int PanelFaultsHide (void);
int PanelFaultsTerm (void);

int PanelAdminInit (void);
int PanelAdminGetHandle (void);
int PanelAdminDisplay (void);
int PanelAdminHide (void);
int PanelAdminTerm (void);

…though it actually looks like one long run-one line for each one if you looked at the pre-processed C output, but the result is the same.

A similar macro could generate the actual functions:

#define STRINGIFY(x) #x
#define TOSTRING(x) STRINGIFY(x)

#define GENERATE_PANEL_FUNCTIONS(panelName, panelResourceID) \
    static int S_##panelName##Handle = 0; /* Zero is not a valid panel handle. */ \
    \
    int panelName##Init (void) \
    { \
        int panelHandle = 0; \
        if (S_##panelName##Handle <= 0) \
        { \
            panelHandle = LoadPanel (0, TOSTRING(panelName)".uir", panelResourceID); \
            if (panelHandle > 0) \
            { \
                S_##panelName##Handle = panelHandle; \
                \
                panelName##UserInit (panelHandle); \
            } \
        } \
        else \
        { \
            panelHandle = S_##panelName##Handle; \
        } \
        return panelHandle; \
    } \
    \
    int panelName##GetHandle (void) \
    { \
         return panelName##Init (); \
    } \
    \
    int panelName##Display (void) \
    { \
        int status = UIEHandleInvalid; \
        int panelHandle = panelName##Init (); \
        if (panelHandle > 0) \
        { \
            status = DisplayPanel (panelHandle); \
        } \
        return status; \
    } \
    \
    int panelName##Hide (void) \
    { \
        int status = UIEHandleInvalid; \
        if (S_##panelName##Handle > 0) \
        { \
            status = HidePanel (S_##panelName##Handle); \
        } \
        return status; \
    } \
    \
    /* Unload the panel, if valid. */ \
    int panelName##Term (void) \
    { \
        int status = UIEHandleInvalid; \
        if (S_##panelName##Handle > 0) \
        { \
            status = DiscardPanel (S_##panelName##Handle); \
            if (status == UIENoError) \
            { \
                S_##panelName##Handle = 0; \
            } \
        } \
        return status; \
    }

That macro would be used like this:

GENERATE_PANEL_FUNCTIONS(PanelMain, PANEL_MAIN)

GENERATE_PANEL_FUNCTIONS(PanelFaults, PANEL_FAULTS)

GENERATE_PANEL_FUNCTIONS(PanelAdmin, PANEL_ADMIN)

…and it would create a fully populated set of functions for those panels.

This allowed me to have a header file that had those macros, such as “PanelMacros.h”, and then have a .c and .h for each panel, or one big file that had them all in it.

// Panels.h
GENERATE_PANEL_PROTOTYPES(PanelMain);
GENERATE_PANEL_PROTOTYPES(PanelFaults);
GENERATE_PANEL_PROTOTYPES(PanelAdmin);

// Panels.c
GENERATE_PANEL_FUNCTIONS(PanelMain, PANEL_MAIN)
GENERATE_PANEL_FUNCTIONS(PanelFaults, PANEL_FAULTS)
GENERATE_PANEL_FUNCTIONS(PanelAdmin, PANEL_ADMIN)

And it worked great! And, if I later decided I wanted to add debugging output or something else, instead of editing one hundred different panel functions I could just modify the macro. For example:

#define GENERATE_PANEL_FUNCTIONS(panelName, panelResourceID) \
    static int S_##panelName##Handle = 0; /* Zero is not a valid panel handle. */ \
    \
    int panelName##Init (void) \
    { \
        int panelHandle = 0; \
        if (S_##panelName##Handle <= 0) \
        { \
            panelHandle = LoadPanel (0, TOSTRING(panelName)".uir", panelResourceID); \
            if (panelHandle > 0) \
            { \
                DebugPrintf ("Panel %s loaded.\n", TOSTRING(panelName)); \
                S_##panelName##Handle = panelHandle; \
                \
                panelName##UserInit (panelHandle); \
            } \
        } \
        else \
        { \
            DebugPrintf ("Panel %s already initialized.\n", TOSTRING(panelName)); \

There are a few things to unpack in this example, such as the use of macros STRINGIFY(x) and TOSTRING(x), but those probably could be their own blog post.

Anyway, if you are lazy, and faced with generating dozens or hundreds of almost identical functions, this macro approach can save a ton of time. The macros I made for my original project, dealing with message functions, are vastly more complex than these, but I figured if I started with those most would run away screaming. (I know I sure would if I had been presented them by a coworker.)

I am sure there will be more to say about this, so perhaps a part 3 will show up.

Until then, I’d love to hear what an experienced C macro programmer has to say about this. I bet there are some better techniques and things I am completely unaware of. I’d love it if you’d share.

Thanks…

Addendum: Since I began writing this post, I have converted about 50 panels at work using a much more complex set of #define macros. They keep evolving as I needed to add support for “parent/child” panels, or extra debugging, or even new functions to check if a panel is displayed at the moment. All I did was update the macro, and the next build could use the new functions. I expect it has already saved me days of typing…

Insta360 X5 vs DJI Osmo 360

On Friday I received my DJI OSMO 360 camera from B&H Photo here in the U.S.A. I took it out on a test ride with my Insta360 X5 next to it to try to capture some comparison video. Unfortunately, the quality coming out of the Osmo 360 was inferior, and I learned it defaulted to “Standard” bitrate but had a setting for “High.” Since my X5 was set to “High” bitrate, I believe my first comparison would not have been a fair on.

Because of that, I will be re-doing these tests again, soon.

I also took both the X5 and Osmo 360 to Lost Island Themepark in Waterloo, Iowa yesterday. While I did not do any head-to-head comparisons, I did use the Osmo 360 a few times under low light conditions. It is my understanding that it is a better 360 camera for low light.

I will begin sharing these to my Sub-Etha Software YouTube channel, shortly.