Last year, I spent some time fooling around in Color BASIC rendering a Donkey Kong-style screen in ASCII. Since I was not using the CoCo 3 40 or 80 column screen, I was limited to the 32×16 text screen of the CoCo’s MC6847 VDG display chip.
First, here is what the arcade Donkey Kong screen looks like. (Image from Wikipedia.com)
Donkey Kong arcade (image from Wikipedia)
For my first attempt, I counted how many “blocks” across the screen it would take to render this level accurately. I did this by looking at the girder patterns where they change levels. It looked like to of the “/\/\” patterns could be a block, making 14 across the screen. I could then double that to 28, which would fit into the CoCo’s 32×16 screen with some space on each side.
I mapped it out in a text editor, and came up with this rough approximation:
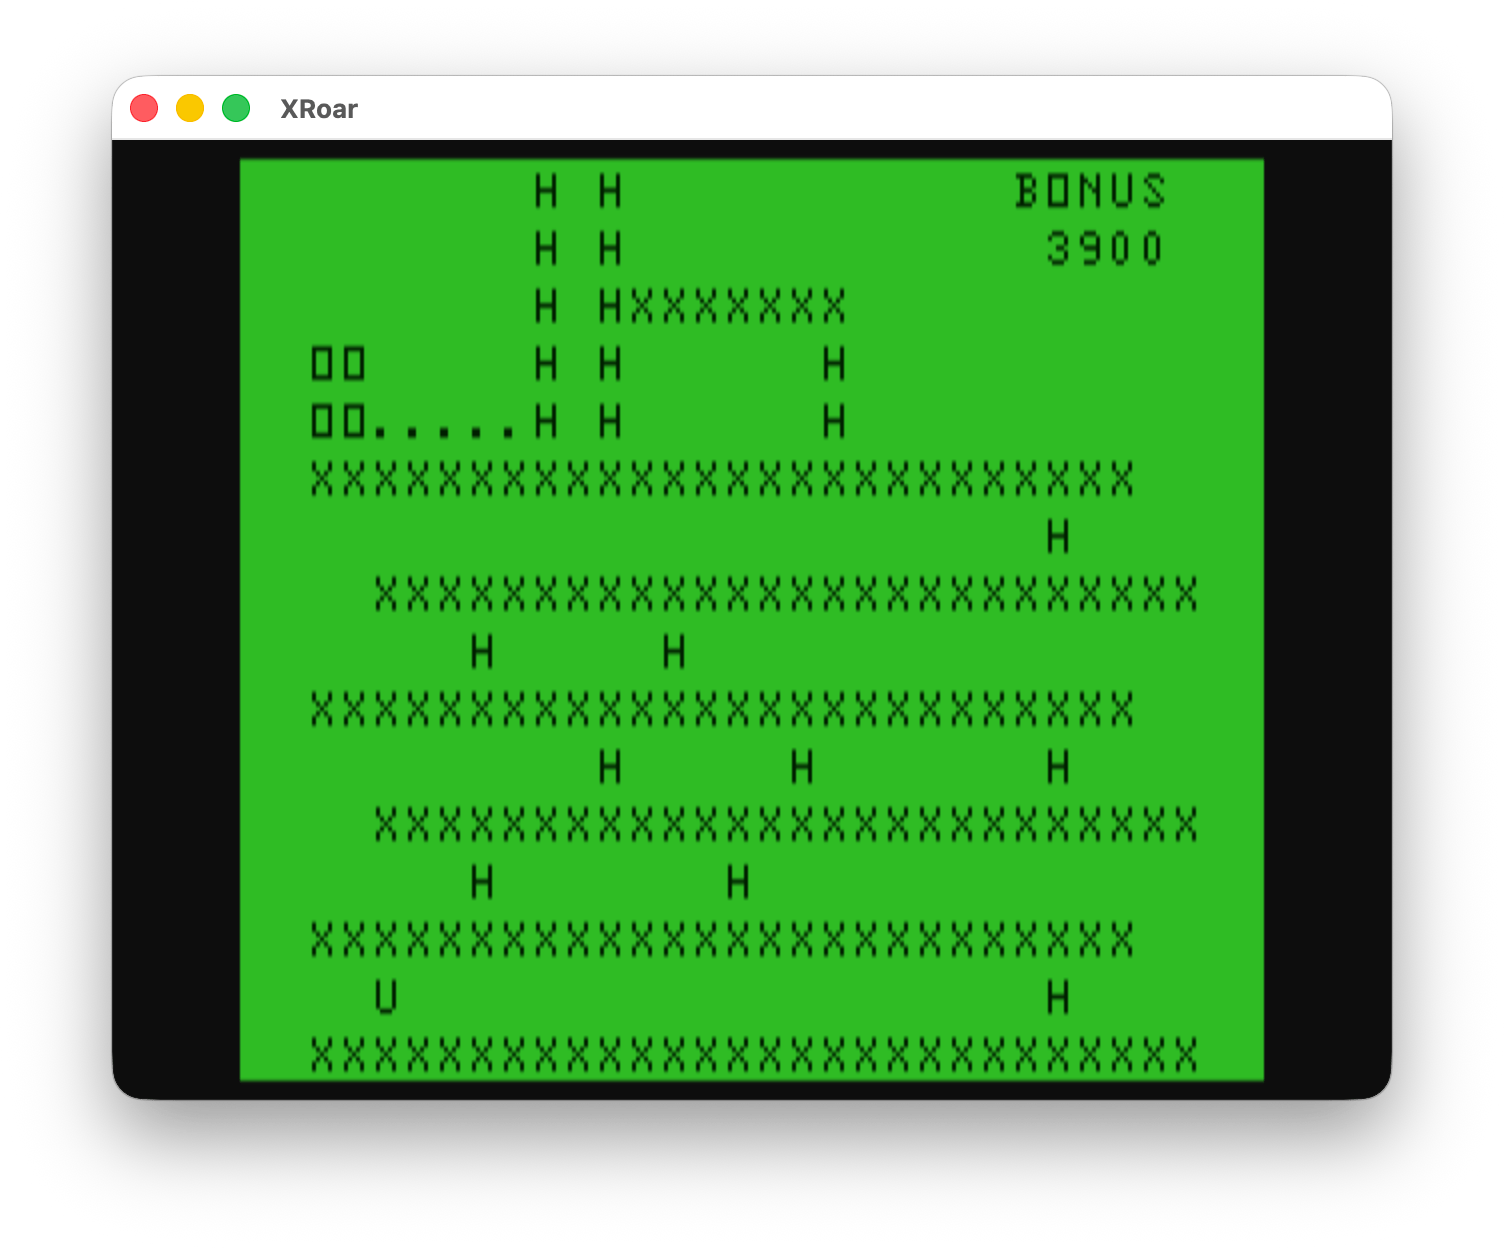
12345678901234567890123456789012
         H H            BONUS
         H H             3900
         H HXXXXXXX
  OO     H H      H
  OO.....H H      H
  XXXXXXXXXXXXXXXXXXXXXXXXXX
                         H
    XXXXXXXXXXXXXXXXXXXXXXXXXX
       H     H
  XXXXXXXXXXXXXXXXXXXXXXXXXX
           H     H       H
    XXXXXXXXXXXXXXXXXXXXXXXXXX
       H       H
  XXXXXXXXXXXXXXXXXXXXXXXXXX
    U                    H
  XXXXXXXXXXXXXXXXXXXXXXXXXXXX
12345678901234567890123456789012
The numbers at the top and bottom were the columns and not part of the screen.
I was then able to use each “block” location to position the ladders (“H”) close to where they should be, as well as where the barrels should go (“U” for the one at the bottom, “O” at the top for the ones next to kong at the top).
If I take that original arcade screen shot and grid it out to be 28×16, it looks like this:
This is when I learned something interesting. Look at how the “1UP”, “HIGH SCORE” and numbers line up to the blocks. Donkey Kong likely is using a 28x?? tile system. This website breaks apart the tiles that make up the game screens:
Indeed, 28 across by what looks like 32 down. As long as the screen could be done with half as many rows, it could be fairly close to the arcade. Here is what my ASCII version looks like on a CoCo emulator:
And let’s see if I can do side-by-side in WordPress:
With 32 rows in the arcade version, Mario and Pauline’s characters would be two blocks high. Since I had to half the rows to fit on the 16 row text screen, they would need to be one character block in height. A similar adjustment would have to be done for Donkey Kong.
In the arcade, Kong looks to be made up of 5×5 blocks and placed on the screen a bit lower in the grid so he stands on the top girder. From looking at arcade sprite resources, they don’t show the girder as part of the Kong graphic, so I will assume 5×5 is correct. When he is facing forward, he is centered, but when he is rolling the barrels, he extends all the way to the left or right boundary.
That is a problem, since at half height, a 5×2 row couldn’t represent Kong very well. This will be one of the major things that has to change to represent Kong on this screen. Looking at the arcade sprites, turned into the 5×4 grid, looks like this:
For my initial ASCII experiment, I came up with these:
-----
@
/=
 |\
-----
  @
 <=>
 / \
-----
    @
   =\
  /|
-----
I kept the area 5 blocks wide, but made it 3 tall and just tried to get something close to the animation the graphical version had. Since I see Kong actually reaches down to the ground, perhaps something like this might be better:
…but I think I prefer the simplicity of the first attempt.
With every row being half the size of the arcade, instead of a rolling barrel being a full block tall, it now is half a block. I could use something like an ASCII period (“.”) I guess. And for the fireball, I could use something like an “*” or maybe “&” or “@”. It gets ugly real fast.
I am going to go think on this a bit… Comments if you have them.
There was a time when any sign you saw was hand drawn. As a child of the 1970s, I remember my daycare bus driving us past a billboard where a man was up there painting it by hand. Lettering on doors and windows would also be hand painted.
Today, digital printing, vinyl cutters and other technologies now do most of these tasks.
Even for the non-artistic, there used to be folks who had excellent handwriting, and others (such as me!) that had unreadable sloppy handwriting.
But on a typewriter, both types of folks could produce the same legible result.
I took drafting in high school. We would sit at a drafting table with a built-in straight edge (ruler) and do everything with a pencil and other tools. Lettering was done by hand.
Then C.A.D. software happened.
Your talent no longer impresses me
There was a time when drawing a perfect circle or straight line was a true talent, but today, anyone at a computer can quickly create a perfect circle or perfectly straight line. While there are people that can still manage to do this without computer assistance, they are just doing it “the hard way.” We are no longer appreciating the result — by we might appreciate the effort. A human that can calculate values in their head is impressive, but no one is impressed if you use a calculator to generate the same result.
This is what I think of when it comes to A.I. As a hobbyist musician, getting into keyboards and MIDI allowed me to perfectly “quantize” my playing so my notes were perfect. Only the best keyboard players could play like that, but my late-1980s synthesizer setup let me do it, and I have awful timing. I still can’t play anything “live” and make it sound good – that remains a domain of the truly talented.
Typing in a prompt and generating a photo or drawing is just modern equivalent of using a computer to draw a straight line or circle. The artists and photographers are just using a new tool that can do some of their work without the actual work.
And the funny thing is, these artists using graphics tablets and drawing software on a computer used those tools to replace the artists that were doing everything with paint and pencils.
Lather, rinse, repeat.
If you go back and look at the very early drawing programs (say, MacPaint in 1984) and compare them to what artists use today, that is a huge leap in “what the computer is doing for you.”
Is A.I. really any different? It is yet another “huge leap.”
This text was generated 100% by a human*. Feel free to be impressed.
Until next time…
* Except for spell checking. Remember dictionaries? Yeah, good times.
On the old school 8-bit home computers, not all of them used ASCII. Commodore used a variation called PETSCII, and the Atari 8-bits used ATASCII. While the trick discussed in this article might work on other systems that have a VARPTR or similar command, this discussion will be specifically about the character set in the Radio Shack Color Computer.
ASCII 65 is the uppercase letter ‘A’
PRINT CHR$(65)
A
If you POKE the value of 65 to the first position on the 32×16 text screen (location 1024), you will also see an uppercase 65.
POKE 1024,65
However, the embedded font data in the MC6847 VDG video generator chip does not follow ASCII for all of its characters. For example, CHR$(0) to CHR(31) are non printable characters. On the CoCo, two of them do something special — CHR$(8) will print a backspace and CHR$(13) will print an ENTER:
It would have been nice if the CoCo could have done a beep for CHR$(7) like Apple 2s did, or clear the screen with CHR$(12) like many other systems did, but those are the only two that do anything other than “print nothing” on the CoCo.
If you POKE around a bit…
While you will not see anything if you PRINT those characters, if you POKE those values to the screen memory you will see something. For example, you could POKE characters 0 to 31 to the first row of the 32 column text screen like this:
FOR A=0 TO 31:POKE 1024+A,A:NEXT
The character set in the video chip has 0-31 representing reverse video characters “@” (AT sign) to “<-” (left arrow). We can expand that loop to POKE the first 128 characters onto the video screen:
FOR A=0 TO 127:POKE 1024+A,A:NEXT
But for PRINTing the ASCII characters, we have already established nothing shows up for characters 0-31, but things do PRINT when for 32-128:
FOR A=32 TO 127:PRINT CHR$(A);:NEXT
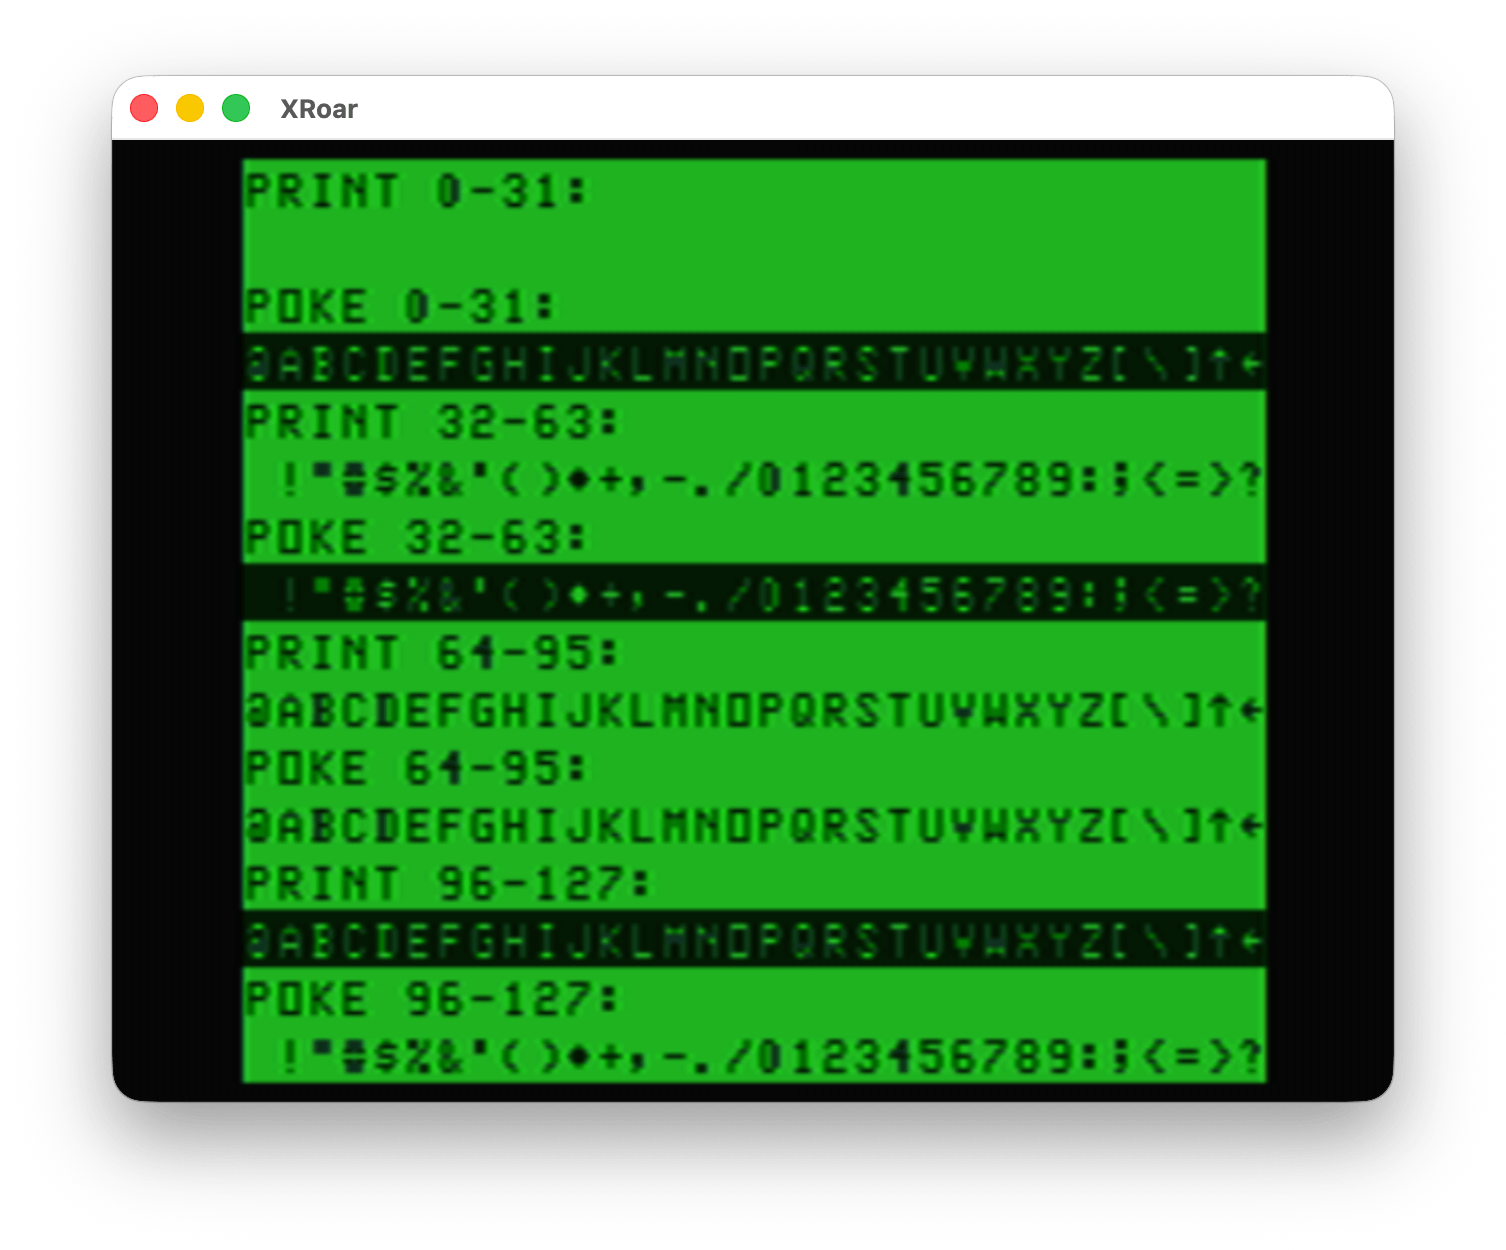
I put together this sloppy program that will show the differences, 32 characters at a time, of what you get when you PRINT the character values versus POKE the character values:
0 'POKEPRNT.BAS
10 CLS

20 PRINT@0,"PRINT 0-31:"
30 FOR A=0 TO 31:PRINT CHR$(A);:NEXT
40 PRINT@64,"POKE 0-31:"
50 FOR A=0 TO 31:POKE 1120+A,A:NEXT

60 PRINT@128,"PRINT 32-63:"
70 FOR A=32 TO 63:PRINT CHR$(A);:NEXT
80 PRINT@192,"POKE 32-63:"
90 FOR A=0 TO 31:POKE 1248+A,32+A:NEXT

100 PRINT@256,"PRINT 64-95:"
110 FOR A=64 TO 95:PRINT CHR$(A);:NEXT
120 PRINT@320,"POKE 64-95:"
130 FOR A=0 TO 31:POKE 1376+A,64+A:NEXT

140 PRINT@384,"PRINT 96-127:"
150 FOR A=96 TO 127:PRINT CHR$(A);:NEXT
160 PRINT@448,"POKE 96-127:"
170 FOR A=0 TO 31:POKE 1504+A,96+A:NEXT

999 GOTO 999
Looking at this, you can see only the characters 64-95 match between PRINT and POKE.
This means that the “copy screen to a string” concept from my earlier post doesn’t really do what we might expect. It does copy the data, but if we PRINT it back, we do not get back exactly what we started with.
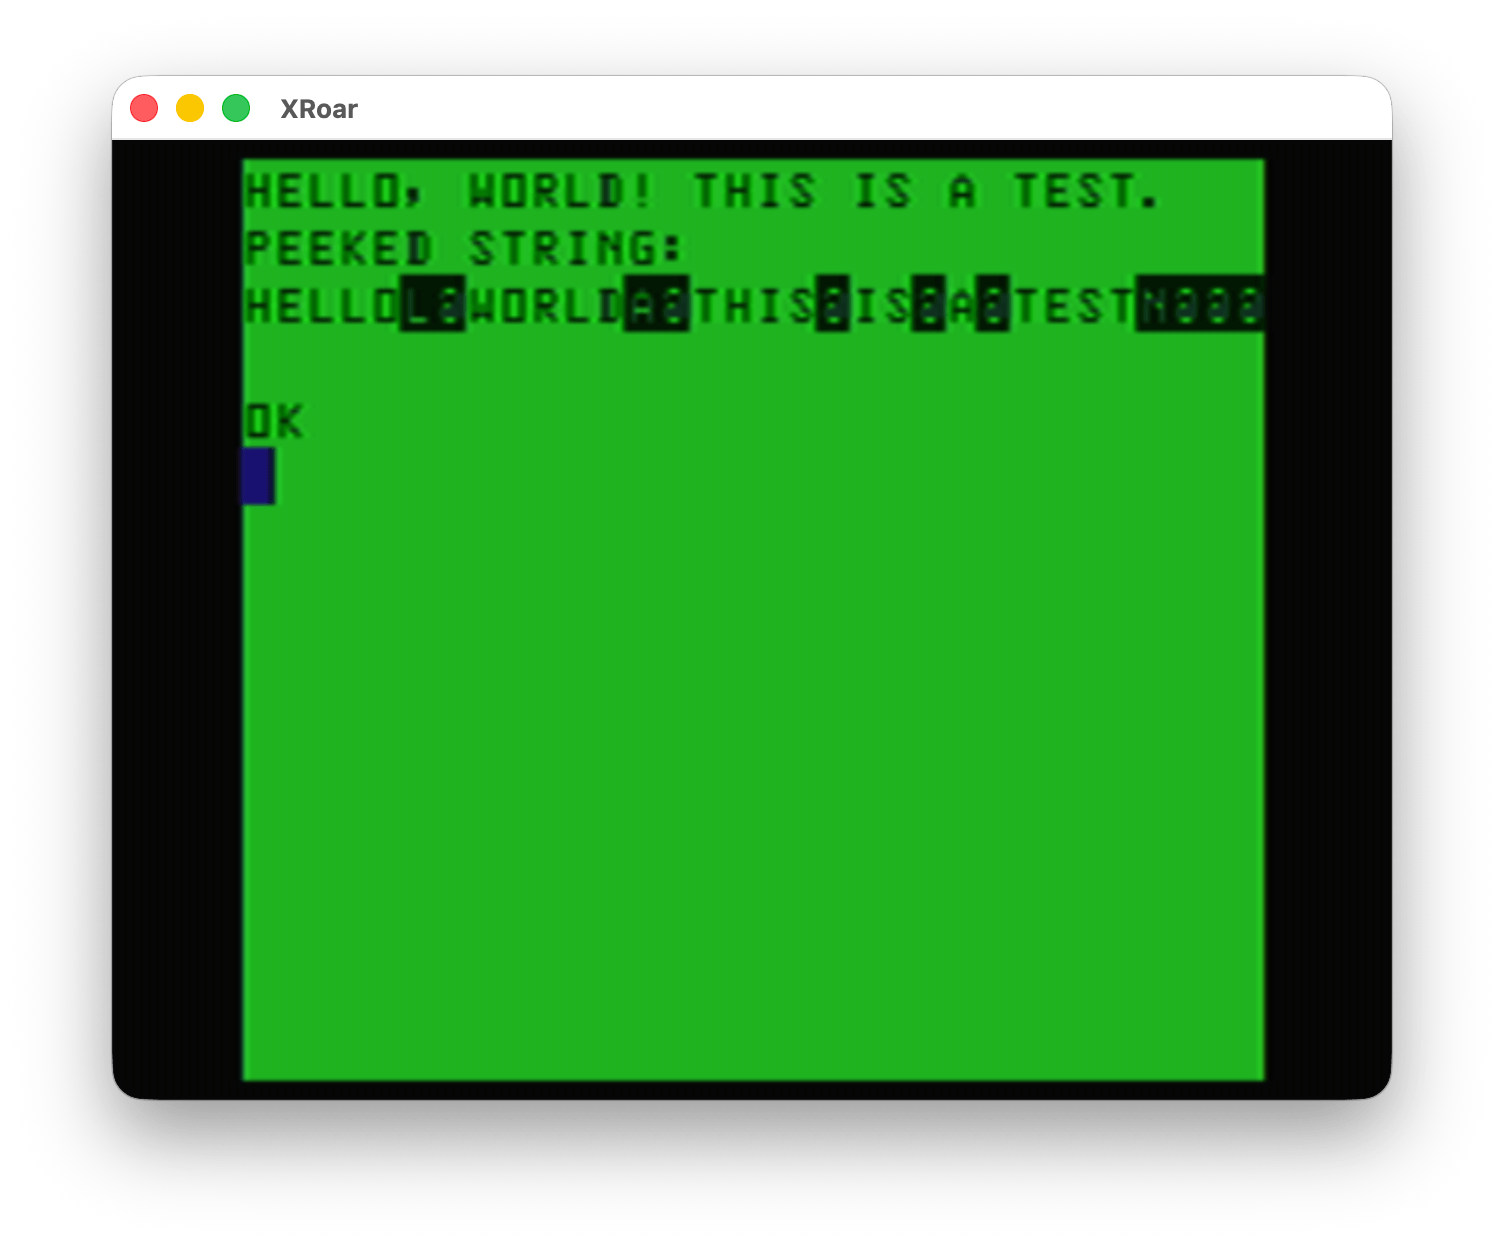
This is the same thing that would happen if you tried to build a string by using PEEK from screen memory. This example prints stuff on the first line of the screen, then builds a string made of up characters using the PEEK value of that first line:
0 'PEEK2STR.BAS
10 CLS
20 PRINT "HELLO, WORLD! THIS IS A TEST."
30 FOR A=1024 TO 1024+31
40 A$=A$+CHR$(PEEK(A))
50 NEXT
60 PRINT "PEEKED STRING:"
70 PRINT A$
And running that shows this awfulness…
Yuck!
But that’s okay since there is not much use to copying TEXT data and then putting it back with PRINT. PRINT is fast, and we can easily PRINT that text data. Sure, there could be benefits if stuff being PRINTed is doing calculations and such to generate the output, but this trick won’t help there.
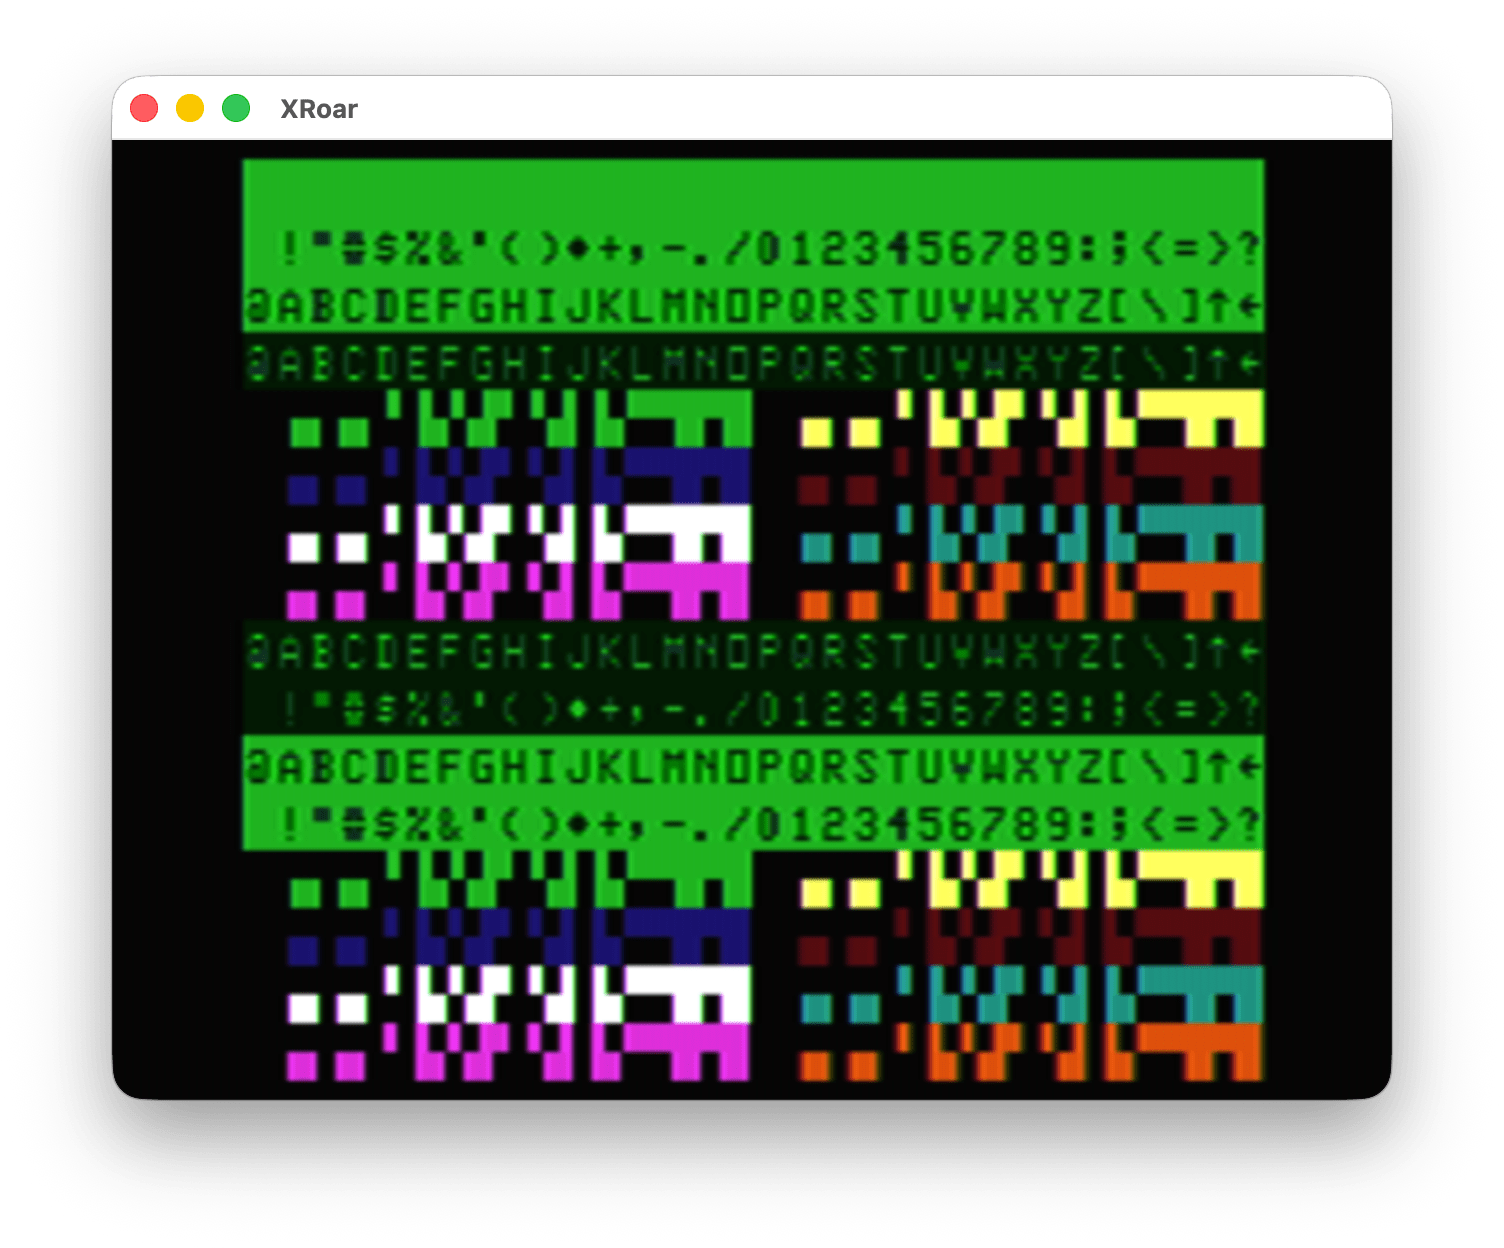
However, the semi graphics characters (128-256) are the same between PRINT and POKE.
0 'POKEPRT2.BAS
10 CLS
20 FOR A=0 TO 255
30 PRINT@A,CHR$(A);
40 POKE 1280+A,A
50 NEXT
60 GOTO 60
The top half is the PRINT CHR$ and the bottom half is the POKE:
Since there is no way on the CoCo to type those semi graphics characters into a string (pity, the later MC-10 could do this), we are forced to PRINT them like this:
PRINT CHR$(128);CHR$(128);CHR$(128)
That would print three black blocks. To speed things up, we could pre-generate a string of those three black blocks then we can PRINT that string very fast later:
A$=CHR$(128);CHR$(128);CHR$(128)
PRINT A$
And now you know why I chose to do a “splash screen” example for my demo in part 1. I initially tried it using the TEXT characters and quickly remembered why that can’t work (as explained here).
But it’s still a neat trick.
Bonus: This is stupid
For dumb fun, here is a program that makes A$ be whatever is on the first 32 character line of the screen.
When you RUN that, doing a PRINT A$ will show a 32 character line that is whatever was on the first line of the screen. If you do a “CLS” to clear the screen and show “OK” on the top line, then PRINT A$, you will see “OK” followed by 30 reverse @ symbols, which is CHR$(96) — but in video memory, a 96 is an empty block (space).
In a recent post about BASIC INSTR, a few comments were left trying to clarify or justify or explain the behavior of why “” is reported as matching the first character in the search string.
PRINT INSTR("ABC","A")
1

PRINT INSTR("ABC","C")
3

PRINT INSTR("ABC","X")
0

PRINT INSTR("ABC","")
1
Copilot AI at least pretends to know the actual reason, which involves saving a few precious bytes in the early 4K Microsoft ROM. The behavior was then retained for backwards compatibility as Microsoft BASIC expanded. Copilot even reports the behavior continued into VB.NET, though I did not fact check this answer.
LuisCOCO commented:
This is logical, if you search for three letters it searches for that piece but when searching for nothing it starts in the first position and searches for zero characters in the destination since it is useless to search for more letters if you search for fewer letters, that brings a null string as the first data found and compares it with the null to search and gives true
– LuisCOCO
Indeed, without a check for an empty string, the search would stop there. “Compare an X byte string to a Y byte string”. As the scan is performed, I suspect the moment a character does not match, it sets the return value to 0. Without looking at the code (yet), my assumption is that it starts with 1 as the return value and just exits when no more bytes are available to compare (immediately with a zero byte target string) leaving the 1 there. Since code exists to flag it with a zero if it a mismatch is encountered, perhaps they did just want to save a few instructions rather than doing a check then branch to that zero return.
Unless there truly is an intentional reason it works this way.
William “Lost Wizard” Astle, who wrote the 6809 assembly (LWasm) I use quite often, explained some math stuff:
Put another way, the empty string is self-evidently a valid substring of every string at every position within that string so it will naturally match the position where the search starts. This is also mathematically correct when you look at set theory. The null set is a subset of all sets.
– William Astle
It seems math folks are fine with how INSTR works. Though math set theory is not where my mind would have been as a child learning BASIC back in junior high school.
William Astle then sends me on a side quest with this comment…
Incidentally, strstr() in C does exactly the same thing with an empty target string.
– William Astle
Let me C what I can find…
strstr() works similarly to BASIC’s INSTR, except it returns a pointer to where the match was found in memory. If no match was found, it returns a NULL pointer (which is 0, matching INSTR).
BASIC gives back a base-1 index, so 1 for a match at the first character of the search string, or 5 for a match starting at the 5th character of the search string. Strings in MS BASIC used “normal” base-1 counting numbers for the index. If you use MID$(), LEFT$(), RIGHT$() and similar string functions, they all use 1 for the first character in a string.
C uses base-0 for indexes, so if you have a string in C:
char *st = "ABC";
…the first character would be index 0, st[0], while in BASIC:
ST$="ABC"
…the first character would be index 1, MID$(ST$,1,1).
int main (int argc, char **argv) { char *search = "ABC"; char *target = NULL; char *ptr = NULL;
// const char * strstr ( const char * str1, const char * str2 ); // A pointer to the first occurrence in str1 of the entire sequence of // characters specified in str2, or a null pointer if the sequence is // not present in str1.
printf ("search = '%s' (%p)\n", search, search);
target = "A"; ptr = strstr (search, target); if (NULL == ptr) { printf ("target '%s' not found in '%s'\n", target, search); } else { printf ("target '%s' found in '%s' at index %d\n", target, search, (ptr - search)); }
target = "C"; ptr = strstr (search, target); if (NULL == ptr) { printf ("target '%s' not found in '%s'\n", target, search); } else { printf ("target '%s' found in '%s' at index %d\n", target, search, (ptr - search)); }
target = "X"; ptr = strstr (search, target); if (NULL == ptr) { printf ("target '%s' not found in '%s'\n", target, search); } else { printf ("target '%s' found in '%s' at index %d\n", target, search, (ptr - search)); }
target = ""; ptr = strstr (search, target); if (NULL == ptr) { printf ("target '%s' not found in '%s'\n", target, search); } else { printf ("target '%s' found in '%s' at index %d\n", target, search, (ptr - search)); }
return EXIT_SUCCESS; }
Yuck. I should have made a function… This produces:
search = 'ABC' (0x58a8ed9ba008)
target 'A' found in 'ABC' at index 0
target 'C' found in 'ABC' at index 2
target 'X' not found in 'ABC'
target '' found in 'ABC' at index 0
I realize my example is … not optimal. strstr() is returning a pointer to memory, and my example is subtracting the pointer where the target string was found from the pointer where the search string is. If they are the same, the math is 0 for the first character. But if the function actually returns a 0 (NULL), that means it was not found. I should have considered that before writing this example ;-)
But I digress…
Which came first?
A quick (and non fact-checked) web search about when strstr was added to C reveals:
The strstr function was added to the C standard library as part of the ANSI C standard (C89/C90), which was approved in 1989 and published in 1990.
Well, at least it worked the same way BASIC programmers would have been used to. But I do wonder if there was an earlier implementation of BASIC that introduced INSTR, or similar.
Another quick (and non fact-checked) web search says DEC BASIC-PLUS for the PDP-11 had a similar function and was introduced in 1970.
If I can figure out how to use the PDP-11 online emulator, maybe I can figure this out:
“If B$ is a null string (B$ = “”), the INSTR functions returns the value 1. The null string is a proper substring of any string and is treated conventionally as the first element of A$ in null string search operations. In addition, if both A$ and B$ and null strings, the INSTR function returns the value of 1″
Unfortunately, the 1971 manual does not specifically address what happens with a null/empty string, but we can for sure say it was definitively documented to do that in the 1975 manual, and without any mention to it being a change from the earlier releases, likely was there in 1971.
I think we have a winner. As described, it is clear the intent matches William Astle‘s comment about null being a proper substring of any string. Microsoft implemented it the way it
Conclusion
I guess all I have to say is that I’d have preferred is for INSTR to return 0 if an empty string was passed in.
Unless someone can tell me the benefit of having it return 1, that is. I am a big fan of changing my own personal views when I learn new information. Just ask me about politics sometime. . . #independent
UPDATE: I believe I have found the answer, and will share it in an upcoming post. Until then, keep those comments coming. I learn so much from all of you!
This topic has been discussed here years ago, but every time something reminds me about it, I get annoyed. While my annoyance is triggered by how it works in the CoCo’s Extended Color BASIC, past research showed the behavior was the same even in much later Microsoft Visual BASIC. But why?
INSTR is a command to return the index where a target string is found in a search string. From one of the Getting Started with Extended Color BASIC manuals, it is shown as this:
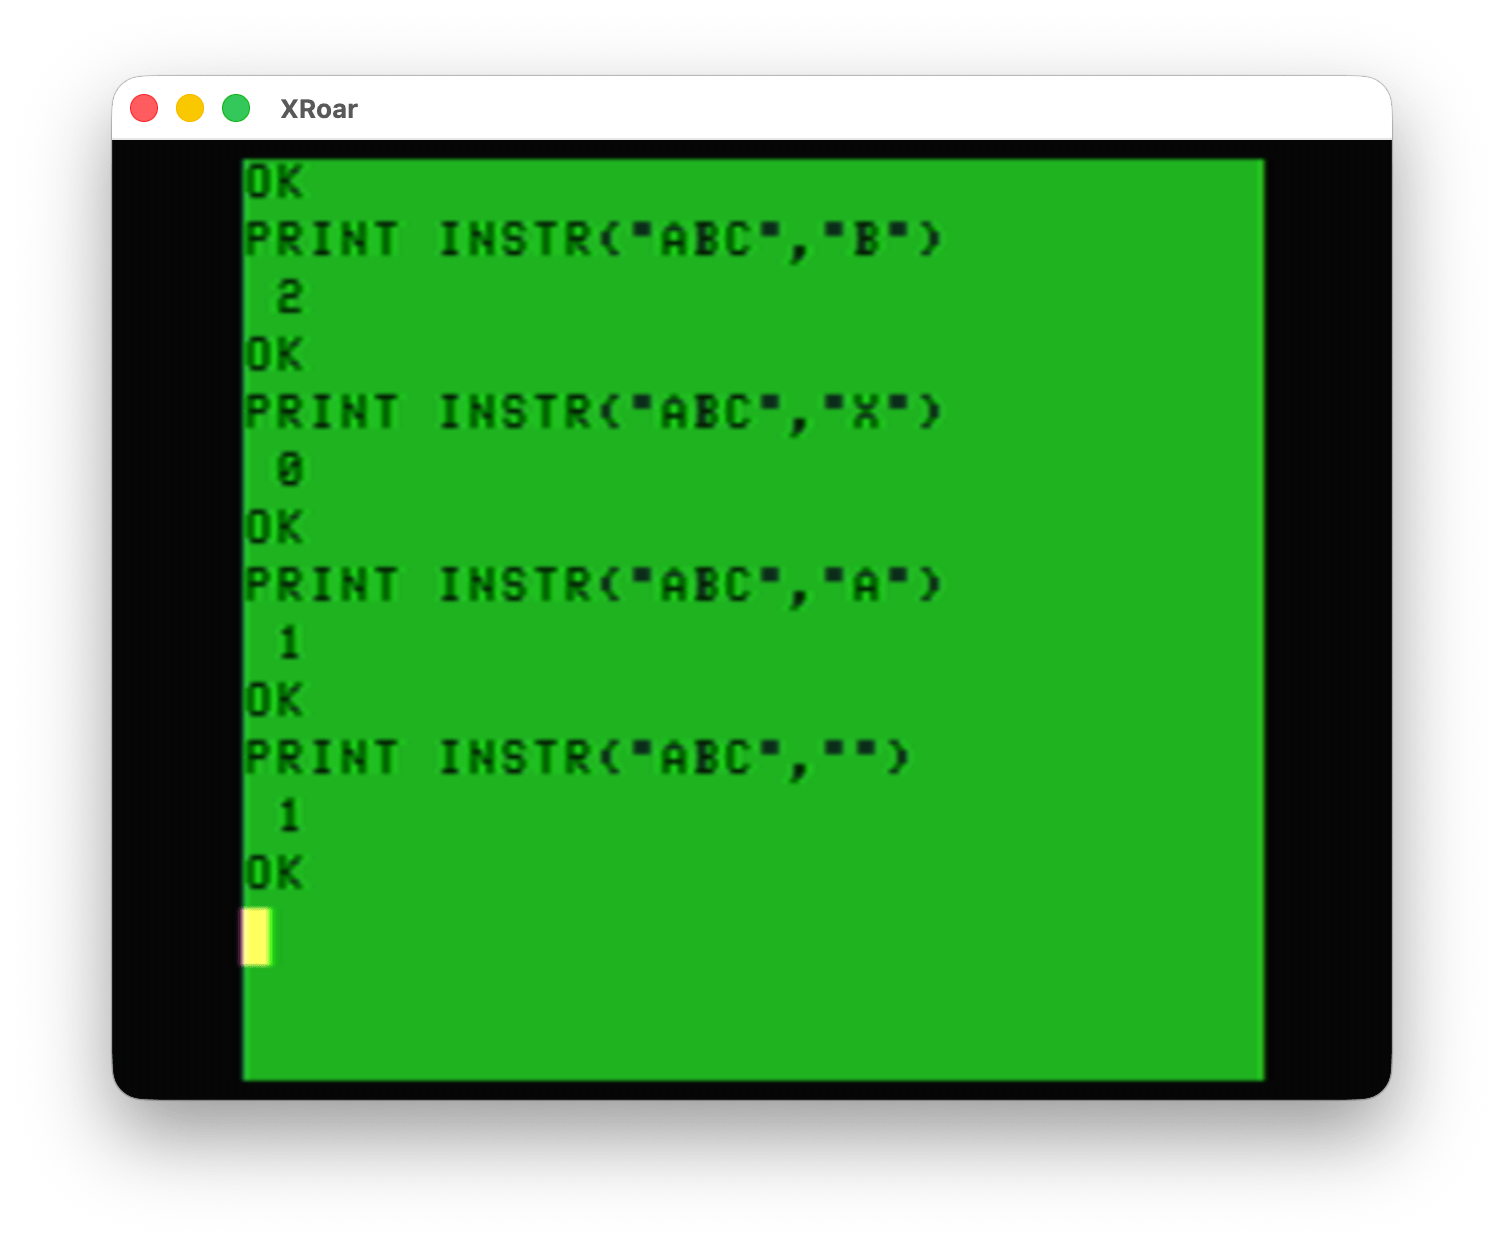
What the manual did not mention is that it can also return 1 when there is no match. See this example:
Looking for “B” in “ABC”? That’s at position 2. Good.
Looking for “X” in “ABC”? It is not there, so it returns 0. Good.
Looking for “A” in “ABC”? That’s at position 1. Good.
Looking for “” in “ABC”? Apparently “” is found at position 1. Don’t tell that to the “A” there.
Callbacks
I ran into this years ago when I was experimenting with various ways to handle key presses. You could have code block until a key was pressed, and then pass the key to INST and then use ON GOTO/GOSUB to get to the routine. Like this:
0 'INSTR.BAS
10 PRINT "A)BORT, R)ETRY, C)ONTINUE:";
20 A$=INKEY$:IF A$="" THEN 20
30 LN=INSTR("ARC",A$)
40 IF LN>0 THEN ON LN GOSUB 1000,2000,3000
50 GOTO 10

1000 ' ABORT
1010 PRINT"ABORT":STOP

2000 ' RETRY
2010 PRINT "RETRY":RETURN

3000 ' CONTINUE
3010 PRINT "CONT":RETURN
This was a great technique when dealing with a long list of menu options.
I had tried to optimize this by eliminating the A$ and embedding it inside the INSTR (someone in the comments may have suggested this to me; not sure if I am clever enough to have thought that up):
ON INSTR("ARC",INKEY$) GOSUB 1000,2000,3000
…but if I put that in my code replacing lines 20-40, running it immediately shows me “ABORT” as if INSTR returned 1.
Because INSTR returned 1.
The workaround suggested to me (again, from smart folks in the comments) was maybe to add a bogus value as the first search string character, and have that routine do nothing.
ON INSTR("*ARC",INKEY$) GOSUB 999,1000,2000,3000
However, for my example where I show the prompt again after it returns, it sticks in a loop printing the prompt over and over again. The code thinks the first option is being selected, then calls that routine (the empty routine that is just a RETURN in line 60) and then prints the prompt again.
One quick solution is to not use RETURN and let each function decide where to go back to. When you GOSUB, BASIC has to scan forward (possibly starting at the top of the program if the line number is before the current line being parsed) to find the target. RETURN lets it “pop” back to right after the GOSUB, so that part is faster.
Also, GOSUB routines can be called from different places in the main code and they will return back to where they were called.
If these routines are never called from anywhere but the menu code, and the extra speed to GOTO back is not a problem, this this change makes it work. And, as a bonus, the fake first GOTO line can just be back to the ON INSTR again since it doesn’t need to do anything:
2026-05-03 – Corrected hex value of 64 (thanks MiaM).
Today I was tagged in a Facebook post by MC-10 (well, and CoCo) programmer, Jim Gerrie. He shared a snipped of code he was trying to get working. The concept was to have stuff on the 32 column text screen get copied into a normal string and then be able to PRINT it back.
Jim’s post (with the code that wasn’t working) with code for the MC-10 was this:
10 CLEAR1200:DIMJ,K,A$,B$:GOSUB100 20 A$=””:K=VARPTR(A$):POKEK,255:POKEK+1,0:POKEK+2,64:B$=A$ 50 CLS:PRINTB$; 60 GOTO60 100 CLS1:PRINT”THIS IS LINE ONE” 110 PRINT”THIS IS LINE TWO” 112 PRINT”THIS IS LINE THREE” 113 PRINT”THIS IS LINE FOUR” 114 PRINT”THIS IS LINE FIVE” 115 PRINT”THIS IS LINE SIX” 116 PRINT”THIS IS LINE SEVEN” 117 PRINT”THIS IS LINE EIGHT”:RETURN
Can someone explain why this program doesn’t work on my TRS-80 MC-10?! It should reassign the memory pointer of string variable A$ to the beginning of screen memory (highbyte 64 lowbyte 0) so that I can then just assign A$ to B$, which will allow me to “capture” the first 255 bytes of screen mem.
It works on the TRS-80 MODEL I/III (using its screen start at highbyte 60 lowbyte 0)!
Any help greatly appreciated.
– Jim Gerrie in the Facebook TRS-80 MC-10 Group.
I could immediately see what the program was attempting to do, and it was something that never occurred to me to try. The concept is “simple” now that I see it:
Stuff is placed on the screen (CLS, PRINT, etc.)
A string (A$) is declared (line 20) and then VARPTR is used to get the memory location of the 5-byte string descriptor for that string. At this point, A$ is zero bytes long, but it will point to somewhere inside the program memory just after the first quote in A=”” because that is where the string begins (even if it is zero bytes long).
The string descriptor is modified using POKE to change the length of the string to 255 bytes, then the start location of the string from that location inside program memory to be the start of the text screen. That was the first bug. The location being POKEd was off by one and was not modifying the string start address properly.
After this, A$ is copied into a normal string, thus saving the contents of the first string (screen memory) into the new string (in normal reserved string memory). This is where the second bug was.
Before continuing, If you need a refreshed on VARPTR, start with this article. It will show how the five byte string descriptor is used. Here is a refresh:
STRING DESCRIPTOR (5 BYTES)
0 - LENGTH OF STRING
1 - NOT USED FOR STRINGS
2 - MSB OF ADDR OF STRING IN MEMORY
3 - LSB OF ADDR OF STRING IN MEMORY
5 - ALWAYS 0 FOR A STRING
The first POKE at the address returned by VARTPR (K) was fine, setting the length to 255. But the next two pokes were at K+1 and K+2. For Color BASIC, they should have been at K+2 and K+3. Also, the values being poked were 0 and 64, which is backwards. From a quick search, the MC-10s text screen starts at the 16K mark, $4000 (16384). To verify this, I went to the online MC-10 emulator here:
…and then did POKE 16384,42. That indeed placed an inverted “*” in the top left of the text screen.
The MC-10 is a big endian processor, so the memory location should be MSB ($40) then LSB ($00). $40 in decimal is 64 in decimal (no HEX support on the MC-10, I don’t think). So the actual pokes to make a string start at the top left corner of the text screen should have been 64 and 0 rather than 0 and 64. (That is 64*256+0 to make 16384.)
Adjusting those POKEs to be at the proper spot in VARPTR and swapping the values to MSB/LSB was the first fix.
At that point, I still wasn’t getting it working. This was due to the initial string being a “hard coded” string in BASIC. When A$=”” was declared in BASIC, it made a string that pointed into the program space. I have not looked into why, but forcing the string to be in RAM by doing A$=””+”” was all I needed to change to make this work. (NOTE TO SELF: Explore this and understand what was different about the program-space string.)
Jim posted a corrected version for the MC-10:
0 CLEAR1200:DIMC1,M$,I$,AA$,BB$:GOSUB100:GOTO20
8 M$="":C1=VARPTR(M$):POKEC1,255:POKEC1+2,64:POKEC1+3,0:AA$=M$+""
9 M$="":C1=VARPTR(M$):POKEC1,255:POKEC1+2,65:POKEC1+3,0:BB$=M$+"":RETURN
20 GOSUB8:CLS:PRINTAA$" "BB$;
60 GOTO60
100 CLS8:PRINT"THIS IS LINE ONE"
110 PRINT"THIS IS LINE TWO"
112 PRINT"THIS IS LINE THREE"
113 PRINT"THIS IS LINE FOUR"
114 PRINT"THIS IS LINE FIVE"
115 PRINT"THIS IS LINE SIX"
116 PRINT"THIS IS LINE SEVEN"
117 PRINT"THIS IS LINE EIGHT"
118 PRINT"THIS IS LINE NINE"
119 PRINT"THIS IS LINE TEN"
120 PRINT"THIS IS LINE ELEVEN"
121 PRINT"THIS IS LINE TWELVE"
122 PRINT"THIS IS LINE THIRTEEN"
123 PRINT"THIS IS LINE FOURTEEN"
124 PRINT"THIS IS LINE FIFTEEN"
125 PRINT"THIS IS LINE SIXTEEN";:RETURN
Meanwhile, I had come up with a silly program that would create some kind of image on the CoCo screen, then capture it in two strings so it could be quickly restored later. Well, almost the entire screen — a string is limited to 255 bytes so two strings captures 510 bytes of the 32×16 screen. If one were to use this trick, it could be adjusted to capture just the number of lines on the screen needed (like, the first 5 lines, or lines 10-20, etc.).
My example looked like this:
0 'SAVESCR1.BAS 10 CLEAR511:DIMS1$,S2$ 11 ' 0 = LEN OF STRING 12 ' 1 = NOT USED FOR STRING 13 ' 2 = MSB OF ADDRESS 14 ' 3 = LSB OF ADDRESS 15 ' 4 = ALWAYS 0 16 ' 1024 = 4*256+0 17 ' 1279 = 4*256+255 20 REM DRAW SCREEN 25 CLS0:C=0:FOR I=0 TO 29 STEP 2 30 SET(I*2,0,C):SET(63-I*2,30,C) 35 SET(0,30-I,C):SET(63,I,C) 40 C=C+1:IF C>7 THEN C=0 50 NEXT 55 PRINT@266,"THIS";CHR$(128)"IS";CHR$(128);"COOL"; 60 'SAVE SCREEN 65 GOSUB 1000 70 'WAIT FOR KEY 75 GOSUB 5000 80 'CLEAR SCREEN 85 CLS 5 90 'WAIT FOR KEY 95 GOSUB 5000 100 'RESTORE SCREEN 105 GOSUB 2000 110 GOTO 70
999 GOTO 999
1000 ' SAVE SCREEN 1005 Z$="":K=VARPTR(Z$):POKEK,255:POKEK+2,4:POKEK+3,0:S1$=Z$+"" 1010 Z$="":K=VARPTR(Z$):POKEK,255:POKEK+2,4:POKEK+3,255:S2$=Z$+"" 1015 RETURN
5000 ' WAIT FOR KEY 5005 IF INKEY$="" THEN 5005 5010 RETURN
I made a “save screen” subroutine at line 1000. My program starts and makes a simple splash screen (colored pixels set around the screen and a text message in the center), then calls the save screen routine which makes a temporary Z$ then modifies it to point to the start of the text screen (1024 – so values 4*256+0) and be 255 bytes long. It then copies that string to S1$. It repeats the process for the next part of the screen, which begins at 1024+255 (1279, so 4*256+255). That is saved in S2$.
Then the main program waits for a keypress, then does a CLS 5 to erase the screen to white, then after another keypress, it calls the “restore screen” subroutine which just prints the two saved strings starting at position 0 on the top left corner of the screen.
AND IT WORKS!
Now blasting bytes to the screen can be as fast as printing a string. I can think of some interesting uses for this, such as “drawing” various levels slowly during initialization, and capturing them to strings so they can be displayed later very fast.
And that gives me an idea for an old project I was playing with some years ago.
But that will have to wait for the next installment…
Just posting this so I can share the link… This was a planning file from my “ASCII Kong” program I am toying with:
---------------------------- 12345678901234567890123456789012 H H BONUS H H 3900 H HXXXXXXX OO H H H OO.....H H H XXXXXXXXXXXXXXXXXXXXXXXXXX H XXXXXXXXXXXXXXXXXXXXXXXXXX H H XXXXXXXXXXXXXXXXXXXXXXXXXX H H H XXXXXXXXXXXXXXXXXXXXXXXXXX H H XXXXXXXXXXXXXXXXXXXXXXXXXX U H XXXXXXXXXXXXXXXXXXXXXXXXXXXX 12345678901234567890123456789012 ---------------------------- ----- @ <=> / \ ----- @ /= |\ ----- @ =\ /| -----
A few years ago, I wrote a short series about my experiences growing up during the video game revolution that started in the 1970s. I hope to finally publish this series later this year, once I have time to find related video clips and photos.
But before I get to this, I thought I’d set the mood with a bit of video game-related trivia about Sub-Etha Software…
As you may know, Sub-Etha Software was not a gaming company. We mostly did application and utility software. However, we did release a graphical adventure game and a Space Invaders-style game, and did resell some games written by others.
In May 1993, at the 2nd annual “Last” Chicago CoCoFEST!, Sub-Etha Software announced something rather silly: a PONG programming contest. (Yes, Pong — the mother of all video games, released by Atari in 1972.)
According to my Fest report of that event, awards were to be given “based on memory efficiency, speed, originality, special effects, and playability for RS-DOS, OS-9, or OSK”. The winner was to be announced in October that year at the Atlanta CoCoFest.
TODO: link to fest report somewhere
I created a small OS-9 Level 2 demo program that played Pong on a text screen, along with details about the contest.
The winner was GNOP byChris Hawks of HawkSoft. This MM/1 (OS-9/68000) program kept the ball frozen in the center of the screen, while the entire box play area scrolled around it, with the paddles having to be controlled as the whole playfield moved. This was a very original take on Pong. HawkSoft made this program available for $5.
This, alone, makes for a cute story, but there’s another tidbit I do not know if I ever shared.
In 1993, Atari Corporation was still around. Their last home computer, the Atari ST, was being discontinued while the company turned its attention to a new video game system: the Atari Jaguar. The Jaguar would debut in November that year as the first home gaming system to use 64-bit chips (back in the day when the cutting edge gaming systems were all claiming 32-bit). Although the Jaguar never really caught on, it had some phenomenal games and was, at least initially, manufactured in the USA by IBM.
But I digress.
The point is, Atari was kind of between successes at the time (and actually would cease to exist just three years later when it was “reverse merged” with a hard drive manufacturer). For some reason, I thought it might be fun to contact Atari and see if I could get permission to legally use the name “Pong” for an official Color Computer version.
That’s right. I was actually trying to license Pong for the CoCo!
I contacted Atari about this (I don’t remember how, but I expect it was via a telephone call) and I recall whoever I spoke to was open to discussing a proposal, but I never pursued it further. Admittedly, I was really just wanting permission to use the name, as Sub-Etha would not have had any resources to pay any significant licensing fee. (Actually, it’s possible I may have contacted an Atari rep via the GEnie online service since they had an active presence there back then.)
I regret not following up on this silly idea. If I had been able to work something out, the CoCo could have been forever listed on the Wikipedia page as one of the only (if not the only) “official” Pong games that ever existed not done by Atari (or whoever owns them today).
Interestingly enough, Pong did make a comeback in 2012 when Atari released a 40th anniversary “Pong World” game for iOS. This version actually started out as an entry in a Pong Indie Developers Challenge where $100,000 was up for grabs to the best new versions of Pong.
Perhaps if Sub-Etha Software had offered that kind of prize (rather than the $1 we offered the winner), we would have had more entries back in 1993.
So there you have it… Another bit of “almost was” history from Sub-Etha Software. Apparently, we had a good idea, but had it 19 years too soon and without enough money to get people interested ;-)
1993 wasn’t my last encounter with Pong… While working for RadiSys, the company that bought Microware (creator of OS-9), we were working with a CPU virtualization company on a product that would allow the real-time OS-9 to run concurrently with Linux on a multi-core CPU. The idea would be the OS-9 side could be used for intense real-time operations, while Linux could be used for application level user interfaces and such.
A Pong demo was created, that showed OS-9 running one paddle and Linux running the other. (I do not recall having anything to do with this demo, but I found it amusing enough that I posted a video of it to YouTube back in 2006.)
I don’t know if this product ever came out or was ever used, but maybe the new owners of Microware OS-9 still have some Pong code kicking around their offices somewhere… ;-)
In addition to the stuff we sold commercially, there were also some random things I wrote for use on my BBS.
SEAdvSys
When I graduated high school and moved to Lufkin, Texas in 1987, a local CoCo Kid (that was actually his handle) Tim Johns had a very unique bulletin board system. I believe it was called “The Adventure System.” When you logged in, you were greeted with a text adventure interface. You could move from room to room just like in an adventure game. If the room did not exist, it offered you a chance to create the room. There was a mailbox which was used for sending messages. Great concept!
In 1993, a Commodore 64 friend, Mark Thomas, had moved on to an Amiga. He was teaching me the C programming language and did so by creating an Adventure System program for OS-9. I found that source code and uploaded it. When I get time, I will see how much of it still works. I do recall having this as an online game on my BBS at the time, and we were all recreating the local Lufkin Mall in the game ;-)
When I first discovered BBSes in Houston, Texas in the early 1980s, there was one person – Judy Scheltema – that maintained a listing of all known BBSes in town. When I moved to Lufkin, Texas in 1987, there was no such list maintainer, so I took on the task of doing it.
At some point, I wrote a C program to help me make an online list. It allows adding, editing and deleting entries. From looking at the source code, I initially wrote it in 1993, then updated it in 1995 for my MM/1 (OSK) and even made it so it could build outside of OS-9. (Most likely on an MS-DOS C compiler I had for my Toshiba laptop.)
I finally found the source code to my graphical “adventure game” which featured digitized photos from the 1992 Atlanta CoCoFest. I called it a simulator because I never completed the game version. The goal would have been to get into the fest and acquire a list of items. In the version we released, there was one puzzle (getting in to the fest) and you could go around and explore and get/drop things, but it was mostly just an exploration program rather than a game.
I cannot find everything I had for this one, but it was an updated graphical adventure that used images from the 1994 Chicago CoCoFest. I have posted the source code for what I had.
At some point, I would like to see if I can build any of this old code. Some items could be made to run on a modern system (macOS terminal or PC command prompt), though the pre-ANSI K&R C would need some updating.
A special thanks to Vaughn Cato for allowing me to share the source code to his “toast” 3-D vector maze test program, as well as his “mapgraph” bitmap scaling test program.
I have placed all of the files on my GitHub site, including the two compiled executables (“toast” and “mapgraph”) as well as the source code he sent me and his last readme. The “toast.ar” file should be the file he sent me back in 1994 that includes all of these files.
And if you are curious to what Vaughn has been up to since 1994, he apparently continues to work with computers to make things appear on screen … Check out his Internet Movie Database entry: